|
Uncertainty Analysis
Uncertainty Analysis – Process of systematically quantifying error
estimates
Measurement Errors
- Bias Error.
- Precision (or random)
Error
- Blunders of
Experimenter
Remember

Uncertainty
analysis is a method to quantify ux
Assumptions:
- Test objectives are
known
- Measurement is
clearly defined process, i.e., calibrations and bias error have been
accounted for.
- Data are obtained
under fixed conditions
- Knowledge of system
components is available
Figure from Text: 5.1 pg.172: Distribution of
errors upon repeated measurements
Bias Errors
A bias error remains constant during a given series of
measurements
Bias errors are estimated by comparison. Various
ways of quantifying are:
- Calibration
- Concomitant
methodology – using different methods of estimating the same thing
and then comparing the results.
- Inter-laboratory
comparisons
- Experience
Table from Text: 5.1 pg.174: Calibration Error
Source group
5.2 pg. 174: Data Acquisition
Error source group
5.3 pg. 175: Data Reduction Error
Source group
Precision Errors
Manifest themselves as scatter of the measured data.
Affected by:
- Measurement system -
Repeatability and resolution
- Measurand - Temporal and spatial
variations e.g. turbulence, random vibrations
- Process - Variations
in operating and environmental conditions
- Measurement Procedure
and technique - Repeatability
NOTE: Treat an error as a
precision error if it can be statistically estimated; or otherwise treat is
as a bias error.
Error Propagation
We will study uncertainty analysis for the following
measurement situations:
- Design stage –
initial analysis performed prior to the measurement
- Single measurement –
used when statistical data is unavailable.
- Multiple measurement –
used when a statistical database has been obtained.
Basic Idea:
- Each element of error
present within a measurement will combine with all others errors to
increase the uncertainty of the measurement. We are interested in
measuring the variable
 .
This measurement is subject to k sources of error, ej, j = 1, 2,
...k. .
This measurement is subject to k sources of error, ej, j = 1, 2,
...k.
- Use Root-Sum-Squares
method (RSS) to obtain the uncertainty in the measurement Ux

Or:
 * * 
VERY CONSERVATIVE ESTIMATE – Assumes
Gaussian behavior and that errors will occur in worst possible way
Example from Text: 5.2 pg. 184
Propagation of Uncertainty to a result
- Many times functional
relationships are used in conjunction with measured variables to determine
a variable of interest.
- The True value of y
depends on the sensitivity in the measurement of x
x
- Perform Taylor series
expansion:

- Assume small changes
so a linear approximation is valid:

- We can argue by
inspection that

- In general,
uncertainty in x, ux is
manifested as an uncertainty in y, uy
as:

- What about
multivariable problems? Let R be the result determined from
several (L) independent variables xi.
i.e.

- R’ is the true
mean stated as
 
 and and 
NOTE:
Assign the uncertainties at the same probability level.
For the multivariable problem then:

Figure from Text: 5.2 pg. 178:
Relationship between a measured variable and a resultant calculated using the
value of that variable.
Design Stage Uncertainty Analysis
Used in initial stages for designing an experiment or
experiments
- What do we know about
the instruments? Perhaps we must select them!
- We can use uncertainty
analysis to guide us in the selection of equipment & procedures.
Zero-order
uncertainty of an instrument
Basic idea
- The value of the
variable to be measured must be affected by the ability to resolve the
information provided by the instruments, even when other sources of
error are zero
- A general rule of
thumb is to assign a numerical value to u0, the zero
order uncertainty, of ½ the instrument resolution at a probability of
95%.

 i.e. 20 to 1 odds that
interval u0. That is only 1 value in 20 will exceed u0. i.e. 20 to 1 odds that
interval u0. That is only 1 value in 20 will exceed u0.
- We can use a
manufacturer statement concerning error.
Table from Text: 1.1 pg. 19: Manufacturer’s
Specifications: Typical Pressure Transducer
- Can say that this is
uncertainty due to the instrument uc

NOTE:
Use RSS method if several instruments are used.
Figure from Text: 5.3 pg. 184: Design-stage
uncertainty procedure in combining uncertainties.
Example from Text: 5.3 pg. 185
Example from Text: 5.5 pg. 190
Multiple – Measurements Uncertainty analysis
Propagation of Elemental Errors.
Procedures for multiple measurement analysis are
- Identify the elemental
errors in the following three source groups (Calibration, data
acquisition, data reduction)
- Estimate the magnitude
of bias and precision error in each of the elemental errors
- Estimate any
propagation of uncertainty through to the result
Figure from Text: 5.6 pg. 195:
Multiple-measurement uncertainty method separates elemental errors into
precision and bias errors.
Figure from Text: 5.7 pg. 196:
Multiple-measurement uncertainty procedure for combining uncertainties.
Note: For tn,95
to compute

How do we find n, the degrees of
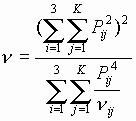
freedom? Remember P* is based on different elements which usually
have different degrees of freedom. Use Welch-Satterthwaite
formula

 - Three source group errors - Three source group errors
 -
Each elemental/error within each group -
Each elemental/error within each group
Note: The book mixes notation
here; early in the chapter P stood for probability which we have picked at
95%, in this equation it denotes precision index
Example from Text: 5.12 pg. 200
Propagation of uncertainty to a result
What happens if we have functional relationships in this case? Remember,
consider the result R
 (95%) (95%)

Now however ur is given as:

 the
propagation of precision through the variables yields: the
propagation of precision through the variables yields:

The bias will propagate as

We combine BR & PR to yield an
estimate of the uncertainty in the result ur

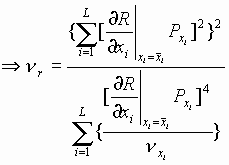
Degrees of freedom n in
each xi is generally not the same. How do we find tn,95?

NOTE: See text example 5.9 pg. 198, Look at it carefully!!
Example from Text: 5.# pg. ###
Single-Measurement Uncertainty Analysis
Used:
- In the advanced design
stage of a test to estimate the expected uncertainty, beyond the initial
design stage estimate.
- To report the results
of a test program that involves measurements over a range of 1 or more
parameters but with no or few replications at each test condition:
Zero-Order
Uncertainty
- All variables and
parameters that affect the outcome of the measurement, including time,
are assumed fixed except for the physical act of the observation. i.e. Data scatter due to u0,
instrumentation resolution, alone.
Higher
Order Uncertainty
- The controllability of
the test operating conditions are considered. e.g. first-order level – time is included.
  , Take N readings in time , Take N readings in time
If  ,
time is not a factor ,
time is not a factor
Nth-order Uncertainty
- Include calibration
uncertainty uc

|


